Friday, February 26, 2010

Delicious Winter Herbs

To expand my green horizons I have decided to embark upon the messy but satisfying task of gardening. Like my cooking, this is a trial and error process that will assuredly end in some pitiful wilting, but what better way to toil the day away than to coax a beautiful bounty from the Jersey soil?

My head-first jump into the garden is more of a toe-wetting. I am planning a small backyard box garden to experiment with some veggies and flowers. Some cherry tomatoes, arugula, chard, possibly a zucchini (just to see if I can do it!) and some hanging peas all lined with some lavender and pansies. I know, I know, how big will this box be, you ask, won't you be overcrowding? Well, yes, but this first garden is an experiment, a little test to see what grows in this earth as well as a huge test of patience for me! If all goes well, I may try some daring plants in the fall! I will update you on my progress. Next up: building a box frame, a task that promises to be dangerous (when did I last use a hammer?) and informative (about what NOT to do!)

In the meantime, to combat the dreariness of this snowy winter, I have planted some simple indoor herbs. This is a perfect winter hobby and the tiny green tendrils peeking out of the pots are so cheery that even another nor'easter couldn't bring me down!


Winter Herb Garden

Needed: Seeds, potting soil, some rocks, small pots

  • Again, I admit that I really don't know what I am doing, but that is what makes it fun and surprising! So, on the advice of some websites I soaked my seeds overnight before planting.
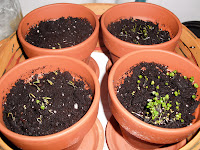
  • In the morning I filled my pots first with some rocks to help with drainage, and then potting soil. I used simple old potting soil, but I am sure that there is something fancy for growing indoors.
  • I sowed the seeds according to the instructions, but need to warn you that soaked basil seeds are not easy to work with. The next time around I will pull those little suckers out for the pre-soak!
  • Then I lightly covered them over with soil and easily watered them.
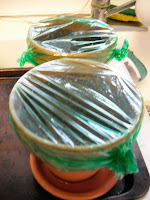
  • Next I covered each pot with plastic wrap, but later found that sandwich bags work better. It forms a tiny greenhouse!
  • Put them near warmth and sun.
  • And low and behold, THEY GROW!


    I chose to plant basil, cilantro, parsley and chives. I literally threw these babies into the soil without any expectations. There are probably a bit too many sprouts and I and most definitely watering them too much, but it is such a pleasure to wake up each morning to a tiny new great shoot with my morning coffee!


Sunday, February 21, 2010

Carbohydrate Crisis - Gnocchi, Ravioli, Fettuccine

I received a hand-crank pasta maker for Christmas. This could have been a wonderful boon to get me in touch with my Italian culinary roots, a machine that might forever destroy my relationship to boxed pasta!

Well, as it turns out, I am not the culinary scion of the family, so I can still enjoy the ease of cheap spaghetti. My pasta adventure was not complete failure, but the ravioli tasted more like spring rolls and the fettuccine felt like rice noodles - maybe I was just yearning for Thai food? In any case, the gnocchi were delectable, but they were also the only recipe that did NOT involve the crank!

I enlisted the help of my good friend Nina who patiently watched as I slowly became a walking white mass of flour. So, let's get this mess started!

Delicious Potato Dumplings of Goodness otherwise known as Gnocchi

Ingredients:
4 big potatoes
2 C Flour (Bread or wheat flour is good)

dash of salt

This is the easiest recipe in the world. You will never have frozen gnocchi again!
  • Bake the potatoes in the microwave or in the oven.
  • As soon as they are done, peel them with a knife (they basically fall apart) but watch your fingers!
  • Use a food grinder to mash up the potatoes.
  • Place the mashed potatoes onto a floured surface and sprinkle some of the flour onto of the potatoes. Add your dash of salt.
  • Knead together.Keep adding flour until it acquires a doughy consistency.
  • Roll out the dough into long strips with hands.
  • Cut strips into 1.5" pieces. You can press them with a fork if desired.
  • Place the cut gnocchi in boiling water until they float.
  • Savor!
Now the difficulties ensue, but all-in-all our creations were delicious!

Cashew-Tofu-Ricotta-Sun-dried-Tomato Filled Ravioli and Fettuccine

Filling:
1 package extra-firm tofu pre
ssed
1/3 C semi-re-hydrated sun-dried tomatoes (soak them in boiling h20 for 15 min)
1/2 C raw cashews
olive oil

Ravioli and Pasta dough:
1 C Flour
2 C Semolina Flour
3/4 C water
olive oil
1 tsp salt


Filling:
  • Place tomatoes, cashews and a drizzle of olive oil into a food processor. Process until a paste is formed.
  • Crumble tofu into the mix and process until smooth adding a bit more olive oil.
Ravioli:
  • Mix the flours, water, olive oil and salt together in a bowl. Mix/knead until an elastic dough forms.
  • Let the dough sit for a half-hour in a slightly oiled bowl covered by a towel.
  • Cut the dough into threes, take one piece, return the others to the covered bowl.
  • Lightly flour the small piece of dough and form into a rectangle. Run through the thickest setting of the pasta maker.
  • Fold the sides in and repeat on the thickest setting. Do this three of four times.
  • Reduce thickness and crank the dough through one time, and repeat thinning the dough with each new setting until desired thickness is reached. I went too thin and would suggest that the third to last is best for ravioli.
  • When the dough is to your liking, cut rectangle sheets to use for both fettuccine and ravioli.
Ravioli:
  • Place small spoonfuls of the filling close to one side of a dough sheet. Fold the sheet over filling and press down.
  • Use a ravioli cutter (or teacup in my case) to cut out the ravioli form.
  • Use the tines of a fork to seal the edges.
  • Place finished ravioli in boiling water until tender.
Fettuccine:
  • Basically you just need to run the sheet through the fettuccine cutter of the machine, make pasta nests and sprinkle with flour until ready to use.

  • Cook for only about three minutes until the noodles separate.

Sunday, February 14, 2010

Valentine French Toast and some Random Notes

I woke up this morning to some delicious aromas permeating the house: strong hot coffee, warm cinnamon, frying batter and the faint scent of pear. Knowing how much I love food, and how much of a treat it is for someone else to do the cooking, Jason prepared a surprise Valentine's Day breakfast!

Breakfast is the most difficult meal for a vegan. American traditions like eggs, bacon and even buttermilk pancakes are hard to replicate in vegan cuisine (I am not a huge fan of tempeh bacon in the morning or tofu scramble, they are much more of a dinner affair for me!). Jason decided to make French Toast with thick Italian bread, cinnamon bananas coupled with the delicious pear bellini! This was the perfect Valentine's gift - that's right, no flowers, no chocolate, no jewelry - all I want is a great cooked meal!

This recipe is adapted from Vegan with a Vengeance and uses chickpea flour, soy cream, rice milk to make the great crusty coating. If you haven't already gotten this cookbook it is about time to order it!

French Toast (based on "Fronch" Toast in VVengance)

Sliced loaf of Italian bread, toasted slightly in the oven
1/2 C soy creamer
1/2 C rice milk
2 T cornstarch
1/4 C chickpea flour
1/2 tsp vanilla
1/2 tsp cinnamon
canola oil for cooking

  • Mix dry ingredients together in small bowl
  • Mix wet ingredients into a large bowl
  • Add dry ingredients to wet ingredients and mix until combined
  • Dip bread (both sides) into the batter and fry in oil until browned on each side.
Cinnamon Bananas

1 banana sliced
1 tsp coconut oil
cinnamon

  • Melt coconut oil in skillet
  • Add banana slices and cook until just warmed
  • Sprinkle with cinnamon
Pear Bellini
* this is not a classic Bellini recipe, rather it is a light drink inspired by the Bellini

Italian prosecco
Pear Juice (or Peach)

  • 2 oz juice to 3 oz prosecco
  • add a raspberry for garnish

********

I am also posting some photos of recipes that I decided to try from The Voluptuous Vegan and the essential The Joy of Vegan Baking.

The VV was recommended to me a while back and I have only recently been trying out some of the recipes. Unlike most of my cookbooks, this book is arranged by full meals. Each recipe bunch works together as a decadent (voluptuous) display of culinary skill. There are even plating suggestions! While I have only gotten through a few of these, I would definitely recommend this to anyone who loves to cook or is looking for really impressive way to entertain. Many of the recipes have a spicy flare and most of them require a lot of time and deft kitchen appliance juggling, but the finished result is well worth it! Even with a messy and impatient cook like myself, these recipes miraculously end up perfect. The other day I made VV's chili and corn-bisciut casserole to great success!

I also recently made this no bake chocolate peanut butter pie from Joy. I am not a fan of PB and chocolate, but I was itching to cook something and went with what I had in the kitchen. This lovely pie tastes like creamy fudge paired with a crispy graham cracker crust! mmmmmm!

Up next: Vegan TVP Noodle casserole. This is my recipe so I'll post it in its entirety.

Happy Valentines!!!

Sunday, February 7, 2010

Vegetable Pot Pie Cups for the Super Bowl

This is the easiest hearty meal in my repertoire. It takes all of 30 minutes and hits the comfort food spot with a splash of charm.

Of my recipes this is probably the least homemade and I wouldn't recommend putting it into the weekly meal rotation, but for an easy indulgence for game day it's perfect! There is something about this meal that faintly reminds me of Yorkshire pudding crossed with a hearty stuffed pie. There is, of course, no meat or cheese in here, but I make up for that with the addition of flaky puff-pastry, a true delight. This last addition also makes this meal quite filling, so I might suggest going light on lunch!

VEGETABLE POT PIE CUPS

Ingredients:
1 package frozen puff pastry cups (check the label some are not vegan!)
1 small onion chopped

1 T olive oil
1 large carrots finely chopped
2 celery stalks finely chopped
1 C chopped potato
2 garlic cloves finely chopped
3C vegetable broth
1C unsweetened soy milk (or rice milk)

3/4 C cooked peas
3 T cornstarch dissolved in 4 T cold water
1 C TVP* (optional)
1 tsp Thyme
1 tsp Sage
1 tsp Tarragon

Salt and Pepper to taste

  • Preheat oven to 400 degrees and add puff pastry cups when ready. Cook for 20-25 min.
  • While the cups are cooking saute' onion, celery, carrot and potato in olive oil for about 7min adding the garlic when there is about 2 min left
  • Add TVP if using and saute' a few more minutes
  • Add thyme, sage, tarragon and saute' another minute for the flavors to combine
  • Pour in 2 cups of the broth and 1 cup soy milk and bring to a rolling boil, reduce to simmer
  • Add peas
  • Add the remaining broth if necessary. I tend to eye the pot and if it seems to chunky I add a 1/2 cup at a time
  • After about 15 min (or when all the vegetables are soft) add the cornstarch to thicken
  • Turn off the heat when it is to your preferred thickness and let sit for five minutes
  • Fill the pastry cups with filling and enjoy!
Most of the time I am too impatient and my vegetables are a little crisp, but it is still a super satisfying meal. This recipe makes a large batch of stew, but this is good the next day over some rustic bread (sort of a vegetable hot "turkey" sandwich).

*TVP or Textured Vegetable Protein is basically protein crumbles derived from soy. It is quite easy to work with and in this recipe gives a chicken-like texture. I like to add this to increase the protein of the meal. It comes hydrated or dehydrated (which needs to be soaked in water before use). You can substitute the TVP with tempeh or tofu cubes if you wish or simply leave it out.